Sunday, August 30, 2009

Venture into Spelt Country

Zucchini is currently kind of an epidemic in my fridge. In all seriousness, this, the most persistent of squash, is showing up in almost everything that I make.
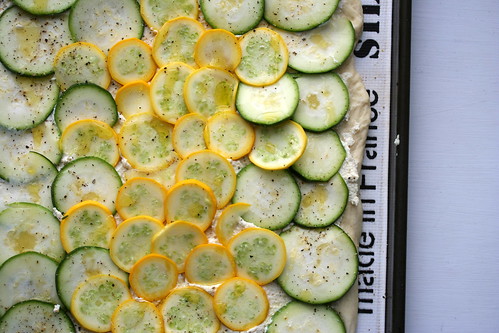
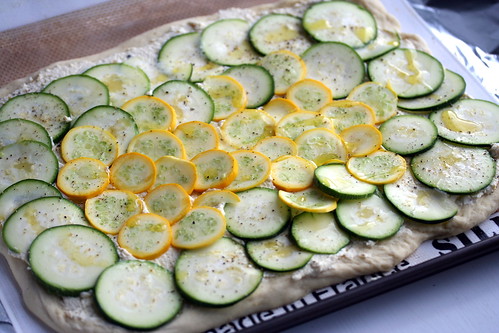
Do you have this problem?
Fight back with zucchini bread.
I don't know about you, but I haven't had the stuff since 3rd grade with Mrs. Nicholson. Even then, all that I remember about it is that it was delicious and I wanted more. So in the face of this mass zucchini takeover, I decided to finally satisfy 9 year old Vanessa's craving.
Now, in an effort to be healthier- or at least, more nutritious, I used spelt flour. This is my first time using it, and to be totally honest, I have no idea how this is healthier than unbleached flour. I did hear, however, that it was tastier, and tastier was more a driving force than the health part. I mean, we're vegan. Come on now.

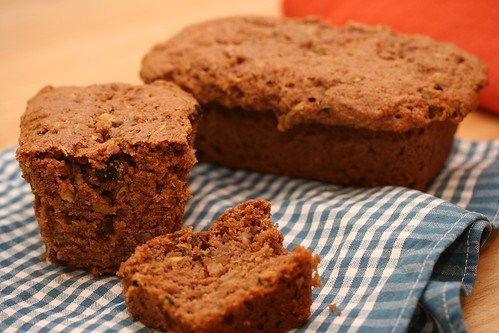
I adapted this from The Compassionate Cook (the first vegan cookbook I ever got, and the one I turn to the most) changing the flour type, sugar, and oil levels. This recipe makes 4 of those cute little tiny loaf pans that I really have no idea why I have. Actually, it made 3 tiny monster overflowing loaves-

Come play with us, Danny...

I recommend using 4. Barring that, try your hand at 2 regular size loaves.

Zucchini Bread

2 cups Zucchini (grated)
3 cups Spelt flour
3/4 cup sugar
1/2 cup maple syrup
1/2 cup soy milk
3/4 cup vegetable oil
3 tsp Egg Replacer
1 tsp salt
1 tsp vanilla
1 Tablespoon baking powder
1 tsp nutmeg
1 Tablespoon cinnamon
1 cup walnuts

Preheat the oven to 350º F and grease the loaf pans.
Mix the dry ingredients together in a large bowl (except the walnuts) and mix the wet ingredients in another.
Add the wet to the dry, and the walnuts, and mix until just combined.
Fill the pans of your choice. For large loaves: 50 - 60 minutes, and for smaller 30-40 minutes, or until a toothpick inserted comes out clean.
As it turns out, the spelt in this recipe behaves a lot like all purpose flour. The dough rose fine, and it wasn't overly dense, dry, or crumbly. In fact, it was a bit tastier, I'd say almost nuttier- but in a very subtle way. So for those of you wanting to venture out into the world of alternative flours, why not give it a shot?


Indulge your childhood memories, clear out your fridge- everybody wins.


Saturday, August 29, 2009

Glory in Simplicity


Some nights when kicking around the house, a bite to eat here and there just needs to be simple, fresh, and good. We've got your back on that one. Left over pseudo-ricotta from the pizza and some of the remaining framer's market haul fit together perfectly into a simple snack-y type deal I've been calling: toasties.
We used the ricotta from the weekend's pizza, some arugula, a nice fresh loaf of ciabatta and came up with:


This isn't really a recipe, it's more of an assembly line. You'll need a good crusty bread for this- I'm sure it would be fine on plain ol' white toast, but let's go for broke, shall we?

The Goods

1 loaf Ciabatta
Left over or freshly made Pseudo-ricotta (recipe)
1 Bunch arugula
Drizzle of extra virgin olive oil

Cut your Ciabatta on the bias (at an angle) More surface area = more goodies = happyface.
Toast slices until lightly golden.
While still warm, spread a thin layer of the pseudo-ricotta, top with the arugula, and drizzle with olive oil.
Crunch on in.
Repeat as needed.

Along this idea of Toasties, we tried a classic bruschetta. You keep that sigh of boredom to yourself, these have a firm basis in the delicious. That bias cut ciabatta bread? Fry it. In olive oil. Do it. Do it like this:
Second Batch o' Goods

Sliced Ciabatta bread
Olive Oil for frying
A pint of cherry or grape tomatoes, halved
Roughly 6-10 leaves of basil
A clove of garlic
Drizzle of extra virgin olive oil
Salt & pepper to taste

Slice your tomatoes in half and set aside in a bowl.
Stack your basil one leaf on top of the other, and roll them up from the bottom stem to the tip. With either a paring knife, or my choice- kitchen shears, thinly slice (chiffonade) the rolled up basil. Sprinkle the basil over the tomatoes, add oil, salt and pepper, and set aside.
For the bread, get your largest skillet- if you have a cast iron one, now would be the time.
Be careful not to overdo it with the olive oil! Too much will overpower the bread and even leave it vaguely bitter. You want to cover the whole bottom of the pan with only the tiniest bit in excess.
Arrange your slices in the pan and toast (yeah, fry) them until golden brown on each side. We're aiming to only flip them once, so keep your eye on them.
Lay the hot bread out on a plate to cool slightly. You could use a cooling rack, mine never got that far.
While cooling, cut the garlic clove in half and rub it over the surface of the hot bread (use tongs, unless you have asbestos hands) Believe it or not, you don't have to press it into the bread to get the flavor. The heat of the bread and the oil of the garlic clove work out just right, a few swipes will do it.
Choose your bread wisely, and top with a spoonful of your tomatoes.
Sometimes the simple can be the divine.


There are probably a mazillion possibilities out there. A fav of mine for breakfast is: Plain ol' toast with white chocolate peanut butter (yep, it's vegan) dotted with fresh blueberries.


What's your favorite?

Monday, August 24, 2009

White Pizza with Dual Color Zucchini

I came across this recipe a bit ago and thought to myself: When was the last time I had white pizza? Was it at Sal's as a 7 year old? Really?
Well, it's quite possible.
It's definitely been longer than since I last had a donut.

Since I saw that, I have been planning and plotting. The key to this recipe is the very thinly sliced zucchini artfully layered across the surface. That way there's no pre-cooking, and no overly raw crunchy zucchini on top of your otherwise perfect pizza.
Now, I thought I would be clever because I have a food processor with mandolin disc blades to do the hard work for me. A food processor that has pretty much been following me where ever I moved since 2001. Well, you see, if you don't have this one plastic stem-like attachment, you pretty much just have a shiny disc blade that no matter how hard you try to cram it into your Cuisinart, just won't stay. You may lose a finger trying to do that too, if you're not careful. Those suckers are sharp.
If you find yourself in the same situation, I advise you to make peace with your knife skills now.

Ready?

White Pizza with Dual Color Zucchini

1 Recipe of Pizza Dough (I picked up a ready made one from Trader Joe's- super simple)
Cornmeal for dusting
2 medium zucchini (one gold, one green)
Juice of 1/2 Lemon

Pseudo-Ricotta
1 16 oz Tub of Tofu
1 tsp salt
A few grinds of cracked black pepper
3 Tablespoons of toasted pine nuts
1/4 cup + 1 heaping tablespoon of Tofutti Cream Cheese
2 - 3 Tablespoons of extra virgin olive oil


Preheat your oven to 450 °F
If you have a pizza stone, you're in luck! If not, you can use a silpat lined cookie sheet.
Lightly dust the silpat with some cornmeal.
Stretch out you dough to the desired shape and let it relax a bit while you chop the veg.
As above, if you're lucky enough to have some sort of mandolin, employ it now- aim for 1/4 inch slices. Elsewise, get in some quality time with your chef's knife.

For the Tofu Ricotta:
This is something I came up with over Christmas a few years back. It's not exactly ricotta, as my Italian mother will inform me of each time, but the tangy-ness from the tofutti cream cheese, and the body from the pine nuts makes it a damn fine substitute, if I don't say so myself.
Drain the tofu (like we did here) and crumble into a food processor (a blender could also work here)
Add all the ingredients except the oil, and pulse to combine.
Drizzle in the oil while blending, and process until you've got a smooth texture.
Spread a layer of the tofu ricotta over the pizza dough- don't lay it on too thick, or your dough will remain somewhat gooey.
Layer on your zucchini slices. You can be fancy, or you can be utilitarian, knock yourself out.


Drizzle the top lightly with olive oil, a bit the juice from the half lemon, and a few grinds of cracked black pepper.


It might be a breadtangle of pizza...
Bake for 15 - 20 minutes, rotating the pizza after 10 minutes.


I'm now inspired to get the missing piece for my Cuisinart, just so I can do this more often. Either that, or my knife skills will become legendary. Legendary.

Tuesday, August 11, 2009

Who needs a weekday supper?

I do!
After work, rush hour traffic, filling up the car so you can actually get home, and getting the team's lotto tickets because hope is like a fever, a girl gets hungry. This must be one of the most bastardized recipes in my repertoire- and it's not that I just sneak the word 'bastard' in where ever I can, because I do, but it is.


Le tale:
Back in the college days at MHC, there was a Caribbean food festival that involved cooking, and eating. I really don't see how you could go wrong with this. At that time, it was snowy as hell, and we were all crowded around the telly of the FP house, watching subtitled Jackie Chan movies. How. Can you. Go wrong.
You can't.
Somewhere in the realm of 2am on a Weds morning, things were abuzz. Delicious things. I found my house mate Alana, who hails from Trinidad, cooking something amazing. It smelled of coconut, spices, and warmth. It radiated through that 190 something year old kitchen (not even kidding), and lured me closer. She told me that It was red beans cooked in coconut milk with an array of spices, and a bit of a kick- it was to be served on Mac & Cheese. 'This part is vegan' she said, 'try it!'
You know those warm, fuzzy, somewhat surreal nights that just stand out in your head even though in the grand scheme of things, so much more has happened? This was one of them.

This is my approximation of the recipe. If you too hail from Trinidad, and you come across this somehow, try not to hold it against me for wanting to mimic the amazing dish, but only going on the memory of taste. Also, let me know the real version!

(Bastardized) Trinidadian Beans

1 can of red Kidney beans
1/2 can of coconut milk
3 cloves of garlic, chopped
1 tsp ground Allspice
1/2 tsp Thyme
Red chili flakes to taste
Salt & Pepper to taste
1/4 tsp Fresh grated Nutmeg at the end

It occurs to me that at some point, I used to add ginger to this. I didn't tonight, and it was delicious. Try a dash if you like.
In a small nonstick pot with just a dash (tsp) of olive oil, briefly
sauté the garlic over medium heat.
Rinse the beans and add them to the pot.
Add the half can of coconut milk and spices to the beans. You want to cover all the beans, and have enough for a decent amount of sauce. Also, it turns an awesome mauve color at this point. How often do you get to say that? Mauve.
Taste for salt / heat levels, and adjust accordingly.
Now, everything in here is cooked, so you really just want to let the sauce thicken a bit, and for the flavors to develop. Simmer on medium / medium low for about 5 to 7 minutes.
Serve this over brown rice. Specifically, my saving grace from Trader Joe's. Highly recommend.


There's something extremely comforting about this dish, even in the swelter of summer.

Saturday, August 8, 2009

Plum Cake, hold the Kuchen

Someday I shall be brave enough to try making a baked good with yeast. Today is not that day.
This is the day I give you, plum cake.
First, the origins. There've been a bunch of recipes for plum kuchen floating about- and also, I found these at the farmers market:


and they were too cute to pass up.
Yes, that is excuse enough for cake.
Cute. Cake. Done.

So here we go:

Plum Cake

1.5 cups flour
1 Tablespoon baking powder
1/2 Stick (4 Tablespoons)
Earth Balance
2/3 cup sugar
3/4 cup soy milk with 2 tsp lime juice
1/2 tsp salt
1/4 tsp cinnamon
1 tsp vanilla extract

A pint of tiny plums! (you can use any plum. I used above tiny sugar plums)
(they were actually a little tart)
(I felt lied to)

Preheat over to 375° F
Grease/flour a round 9 inch cake pan.
If you haven't already, combine the 3/4 cup soy milk with the 2 tsp of lime juice. Give it a stir, and set it aside to separate.
In a mixer, or with a hand mixer, or with a fork and some bicep action, cream the Earth Balance on its own until whipped / paler in color.
Add the sugar and continue to beat for anywhere between 2 - 5 minutes, until throughly incorporated and pretty fluffy.
Combine the flour, baking powder, salt, and cinnamon in a bowl.
In the mixer, or the bowl you've been buffing out that one arm with, add roughly a third of the soy milk mixture and the teaspoon of vanilla.
Add about a third of the dry ingredients to that and turn the mixer on low to just barely combine.
Repeat this until you've incorporated all the ingredients. You want to end with the dry ingredients, and take care not to over mix!
This will be a bit of a thick batter-it's okay, the plums are juicy. Pour it into your prepped cake pan.

As for the plums: Sometimes, there is a bit of bitterness in the skins. I find this to be a bit odd, sugar plums... Pop one in your mouth to verify if you too have this issue. You may want to take that extra step to peel them. If you don't peel them, it's not really a problem. It adds an interesting dimension to the sweet cake and the concentrated fruit. You're going to pit and halve your plums. Arrange them as you like on top of your cake batter and sprinkle with sugar.
Told you they were juicy.

Bake at
375° F for 30 - 35 minutes, or until an inserted toothpick comes out clean.
Let the cake cool in the pan for about 10 minutes.

Then gently turn out onto a wire rack.

It looks like it's smiling, and yes, I tried a nub from the bottom. It was delicious.
You have successfully avoided making kuchen. You have not confronted your fear of yeast. You have passively aggressively (and 2nd person-edly) challenged yourself to make a risen baked product in the near future. (foreshadowing)

I mean, enjoy!


In the meantime, come visit us at Hungryface!


Sunday, August 2, 2009

Wherein I confront: Pie.

For a long time, I have stood on the edge of abyss, contemplating the perils that lay within: Cold pseudo-butter, ice water, a touch of sugar, and flour. Pie Crust.
Doom.

I'm a long time fan of pie- from the pot pies of childhood, to the chocolate peanut butter death I concocted a couple years back- but I have never, ever, made a crust. So, I fled to my mountain sanctuary ( ie: I went to Vermont on a vacation) with one goal in mind: Make a damn pie. From Scratch.

While there, I came across this farm stand, and kind of fell in love.

I may or may not have left with a box of goodies

I was taken with the fresh, and extremely local fruit, and selected a few possibilities for pie. Having never tried red currants before, I was surprised to find that they were (crazy) sour. Blueberries? Pretty out of this world good. And cherries... Well, I did have a cherry pitter on hand, and they're really cute looking, so let's go with those.

My guide for this pastry-venture was This Book, which contains an awe-inspiring amount of pies. While they're not vegan offhand, the fruit pies are easily modified. As I set about to selecting which of the cherry pies to make, I noticed that my cherries were on the tinier side, and sort of brighter red than any variety back home. A taste revealed, hellowearequiteSOURhowdoyoulikemenow?
Hm.
Oh look at that, sour cherry pie recipe. Thanks, book of a million pies.

So let's get down to business, shall we?


From Ken Headrich (Halved, as my destination was not a deep dish vessel)
Sour Cherry Pie

Crust
(single)
1.5 cups flour
1.5 teaspoons sugar
1/4 tsp salt
1 stick (8 tablespoons) Earth balance (cut into 1/4 inch pieces)
1/4 cup very cold water


Filling
3 cups pitted sour cherries
2/3 cup + 1 Tablespoon sugar
1/8 cup cornstarch (tricky business)
1 tsp fresh lime (original calls for lemon, but you work with what you've got)
Grated zest of 1 lime/lemon
2 Tablespoons cold
Earth Balance

Start the crust first. I was using a cute little 7 or 8 inch pie dish, so once recipe yielded enough for a bottom and lattice top crust. If you're using a conventional pie dish, double said recipe.
In a large bowl, combine the flour and sugar until well incorporated.
Scatter the cold earth balance over the dry ingredients and toss a bit.
Using a pastry cutter, or two butter knives (kind of annoying, but the route I went), cut the fat into the flour until the fat pieces are roughly pea sized all throughout.
Sprinkle a third of the cold water over the mixture and toss (with a fork or spatula) to dampen. Do this twice more, toss and mixing, from the bottom of the bowl up to the top. If the dough comes together easily, or is packable, you're good for the next step- If not, add a teaspoon of water and repeat until dough is packable. Don't over mix the dough! If it can hold a ball shape, it's good. It may be a little crumbly, but it will be ok.
Divide the dough into 2 pieces, a smaller one for the lattice top, and a larger one for the bottom crust, wrap in plastic wrap, and stick in the fridge. Let the dough rest for at least one hour.

While the dough is resting, get yourself a chair and a cherry pitter and have at it.
In another bowl, combine the sugar with the cornstarch. Mixing the cornstarch in with the sugar first will prevent any clumping.
Add the sugar mixture to the cherries, add the lime/lemon juice and zest, and stir.
Set aside for around 10 minutes to juice.


Preheat the oven to
400° F
While your filling is juicing away, assuming an hour has passed, take out your pie dough.
Let it come to temperature for somewhere around 5 to 10 minutes. There are a million ways to roll out pie dough- Here's how I did it, take from it what lessons you will:
For the larger ball of dough:
Flour the counter, for added non-stick factor, lay down a sheet of parchment paper or plastic wrap and flour that.
Flour your rolling pin
Apply even, gentle pressure and roll in one direction out from the center.
Pick up the dough (gently) and rotate it a quarter turn, and roll out from the center again.
Repeat until the dough is about 1/4 inch thick.
Gently pick up the parchment and slide dough off on to your pie dish.
Trim any excess and set aside the scraps with the smaller ball of dough.
Shape your pie crust edges in a fancy fashion, or leave it all rustic-like.
At this point, I added the filling.

Top crust:
Roll out the dough as above.
With a pastry cuter or a sharp knife, cut 1/2 inch strips (about four of them, six if you have a larger pie dish)
Take the strips and lay half of them in one direction vertically across your filled pie.
Fold every other of those strips back, and lay one strip horizontally across.
Replace the folded back vertical strips, and repeat with the ones you didn't fold back.
Lay another horizontal strip across, and replace the folded back strips.
Repeat this until it looks roughly like this:


And yes, I was going for rustic.
Also, it was after midnight at this point.
hmph.
Brush your work of art with soy milk (coconut milk would also be fantastic) and sprinkle with sugar.

And now, we're going to bake this sucker.
Set your pie on a tinfoil-lined sheet pan, and use a piece of tinfoil to tent over the top of the pie. You don't want to seal it to the pie plate, you just want to cover the crust so it doesn't burn.
Place on center rack in the over and bake for 30 minutes.
Lower the oven temperature to 375
° F, and rotate the pan 180°
Remove the tinfoil on top, and bake for about 35 - 40 minutes until crust is golden brown, and filling is thick and bubbly.
A-like so:


I recommend soy whip, or some non-dairy ice cream goodness of the vanilla variety as a Coup de grâce.