Tuesday, April 30, 2013

A Simple Taste of Springtime

Peas are a rare treat that remind you, after a month or two of indecision, that it's finally spring time. They have a short window of sweet goodness to grasp at, so when I see them I snatch them up.  The one thing I always seem to forget is, no matter how cute the little suckers are, no matter how sweet, you still have to shell the darn things.  Like pitting sour cherries, or juicing key limes, it's the seasonal treat you love, and love to hate. So pull up a chair, and get set to mutter at these sassafrassing good fer nothin' tasty treats, because you only get so long to do so.
I know you can buy them already shelled, but I like to pretend there's a certain freshness you gain on the journey from pod to pea (though I've got nothing to back that one up)
No soup here, but a spread, and a darned simple and tasty one. Do yourself a favor first, spring on some fancy bread. I don't want to see any bargain brand white defacing your table when only something artisanal, or at least multigrain, will do. Personally, I picked up some million grain/seed bread at the year round New Haven Farmer's market (Sono Bakery)


Of course, I'll gnaw on the stuff the whole ride home too, but whatever was left I slathered with this green goodness. You can easily scale this recipe up, depending on both your bounty, and patience for shelling the things.

Spring Peas, If you Please
1 cup Shelled peas 
1/3 cup Hazelnuts 
1 Tablespoon Fresh lemon juice
5 Leaves or so of Fresh mint
Extra virgin olive oil to combine
Salt/Pepper to taste

I tried a fork, a foodmill, and then resigned myself to food processor. Fresh peas are nothing if not resilient. Combine the peas, hazelnuts, lemon juice, mint, and salt/pepper in the food processor and get to whizzing. Slowly drizzle in the olive oil while running until a cohesive paste forms. You can add more, depending on the consistency you want. I left mine a  paste chunky enough to stand up to the bread.


Rustic, verdant, and literally easy peasy. Celebrate the soon to open farmer's markets/farm stands (so exciting!) without even having to turn on your oven, or break a sweat.


Tuesday, March 19, 2013

Double Wides, a Cookie for Everything You're Craving

Some days, your muse speaks to you from a place deep, dark, and tucked away in the recesses of your subconscious.  Maybe it's a part of you you didn't even know existed, maybe it's the childhood self you denied, but it was lurking there, waiting for the opportune moment, say 3AM, to strike.  I want potato chips! It says. I want peanut butter! It demands. I want chocolate! It wails.

I WANT ALL THREE! It bellows.

It's okay, dark, twisted, childhood self; I'm on-board with this crazy, calorie-packed roller coaster of delight. After all, a life of moderation is a life un-lived.

Now we come to how we construct this dark carnival sideshow of a taste sensation. I feel like everyone needs more cookies in their life, and really,  it's hard to go wrong with a cookie. Portable, portion-controlled, joy-inducing, and they even give you a modicum of, at least perceived, restraint.


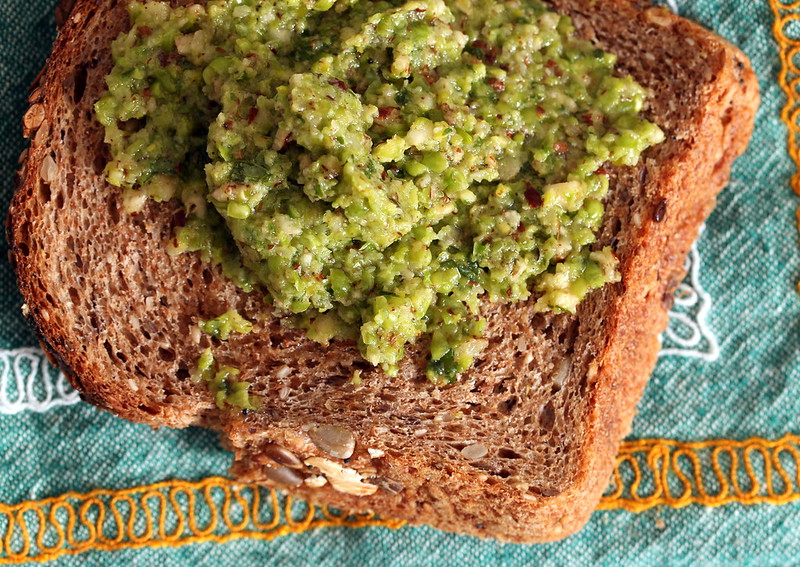
Therefore, our stage is to be set on a humble looking, light cookie.  First things first though, we begin with our filling.


Double Wides

The Filling
3/4 cup Smooth peanut butter
1/2 cup Dark or bittersweet chocolate chips
1/2 cup Potato chips 

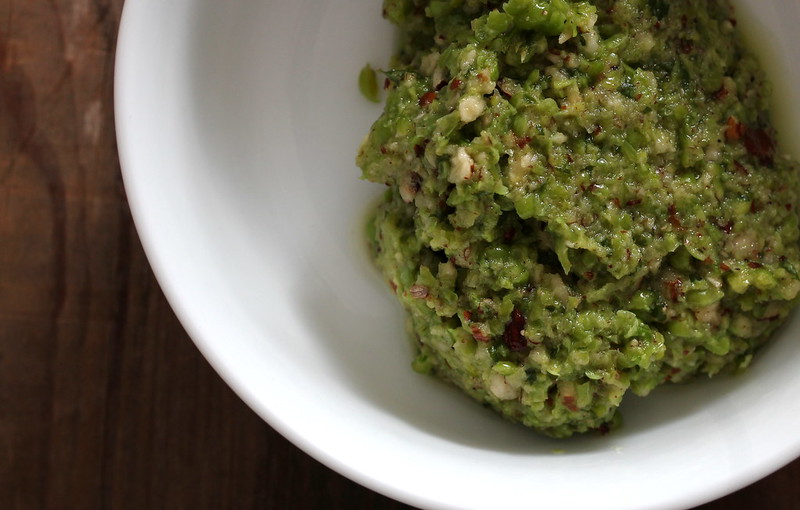
There really is nothing more satisfying than using most, if not all, of a jar of peanut butter in one go. Smack the 3/4 cup of peanut butter down in a large mixing bowl. In a separate heat-proof bowl, melt your chocolate chips in the microwave in 30 second bursts. Zap for 30 seconds, mix, zap for another 30 seconds, and mix. Do this until they have melted. If it's largely melted, but you still see some chip forms, keep stirring. The residual heat in the mixture should be able to melt those last stubborn ones. 
Mix your melted chocolate into the peanut butter with your favorite spatula.
Here's where we add the potato chips. I chose a plain kettle style chip. What happens if you use jalapeno flavored chips? What happens indeed.  They'll break up as you stir them. If not, they'll definitely break up in the next step.
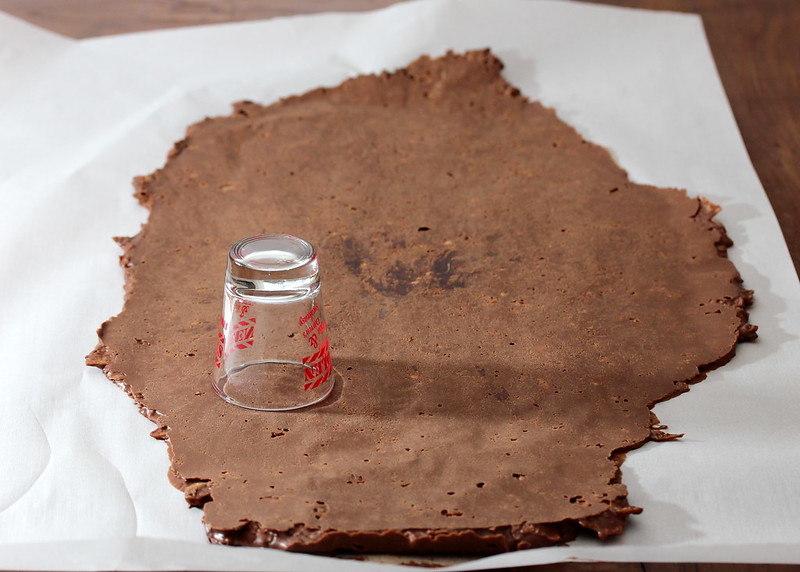
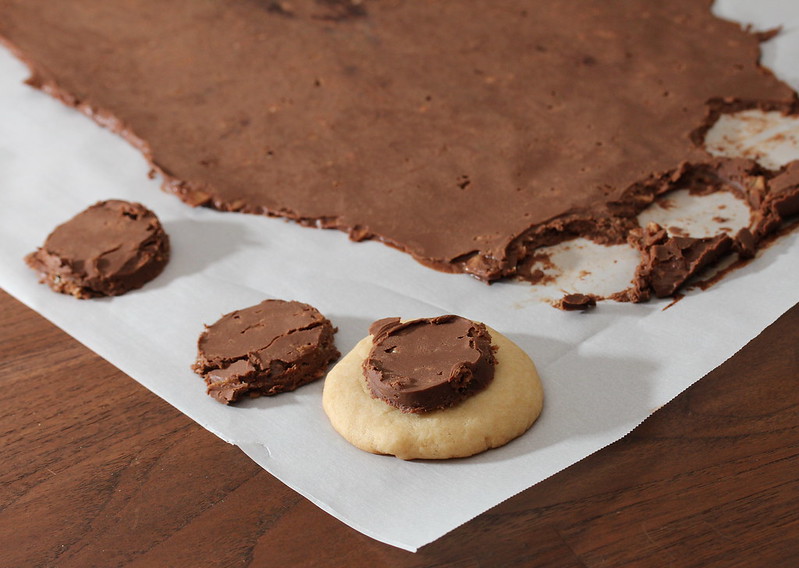
Once your filling is all mixed up, lay it out on a sheet of parchment paper, and cover it with another sheet of parchment paper. Roll that beast of a filling out until it's about 1/4 of an inch thick.


Make some room in your fridge, and park this there for about a half an hour. While you wait, let's get started on those cookies!

Do you remember those mass-marketed, lightly crisp, vaguely chocolatey (unless you got the double-stuffed, we have to cede that we at least remember them to be tasty) cookies from those-who-shall-not-directly-be-named? Only better, we'll call them Forlis (adapted from this awesome post)

'Forli' Cookie Foundation
 2 cups Flour
1/2 tsp Salt
1-1/2 tsp Baking powder
1/4 tsp Baking soda
 1-1/2 stick (12 Tablespoons) Earth Balance
3/4 cup Sugar
2 tsp Vanilla
1 tsp Fresh lemon juice
2 Tablespoons Coconut milk

Preheat your oven to 325° F/ 163° C
Combine your dry ingredients in a bowl and mix to incorporate. In the bowl of your stand mixer, or with some elbow grease, a fork, and some patience, cream your earth balance and sugar until light and fluffy.  Add in your vanilla, lemon juice, and coconut milk and mix a bit more. Add in your dry ingredients slowly (low speed if using a mixer) a third at a time. If at any point, the mixer gives you trouble, use your hands instead. 
Portion your dough out in silver dollar sized flattened circles on a parchment or silicone lined baking sheet, and bake for 15-18 minutes. Cool on a rack.

While these cool, it's time to make the ganache! There's a method to our madness, after all.

Simplistic Ganache

1/2 cup Chocolate Chips
3/4 cup Coconut milk (heated)
pinch of salt
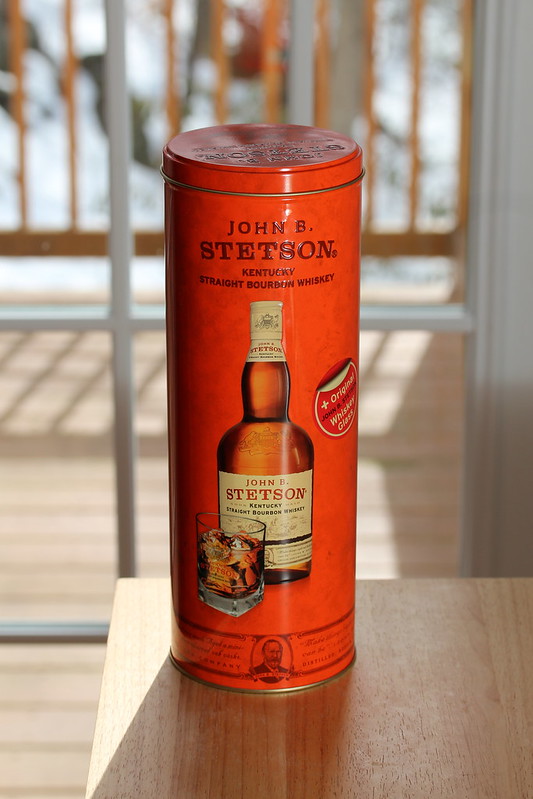
1 or 2 tablespoons Bourbon  (If you're going to go, go big)


In a pyrex, or heat safe bowl, combine your chocolate chips, salt, and bourbon. Heat your coconut milk, and the microwave is fine for this,  and pour over the chips. Let it sit for a bit, and then stir. Stir like you've never stirred before. In the beginning, it will look messy and non-congruent, but keep going and it will become glossy and beautiful. Set this aside to cool; if you're as impatient as I am, put it in the freezer.

Now it's time for the assembly line. Fetch your filling and notice that it has become a solid mass. You can now cut it into circles to adorn your cookies.  I used a shot glass.


 Make absolutely sure your cookies are cool! Else all is for naught, and woe shall dog you with each day that passes, until happiness is no more. You didn't come this far for a slap-dash effort in the end.
Assemble them exactly like you think you would.


Also, see how bad I am at gauging sizes. It's fine, they wind up looking like little UFOs, and I'm at peace with that.

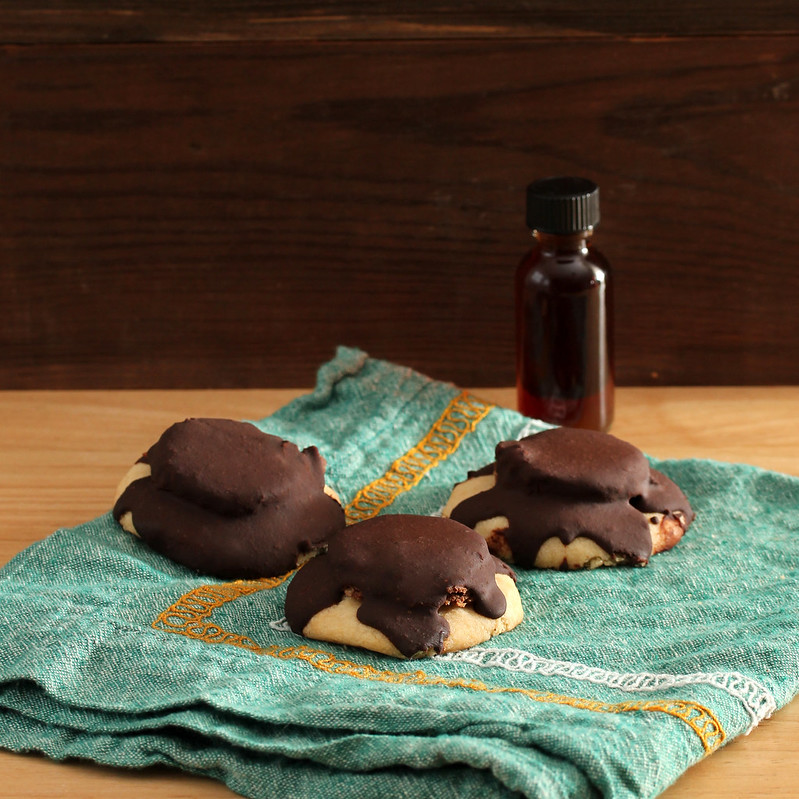
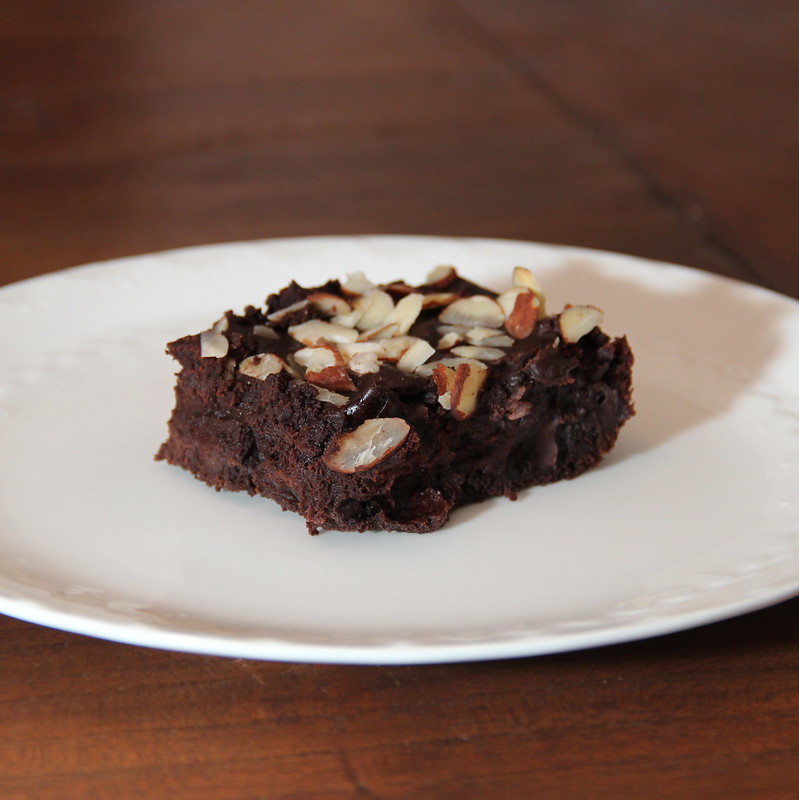
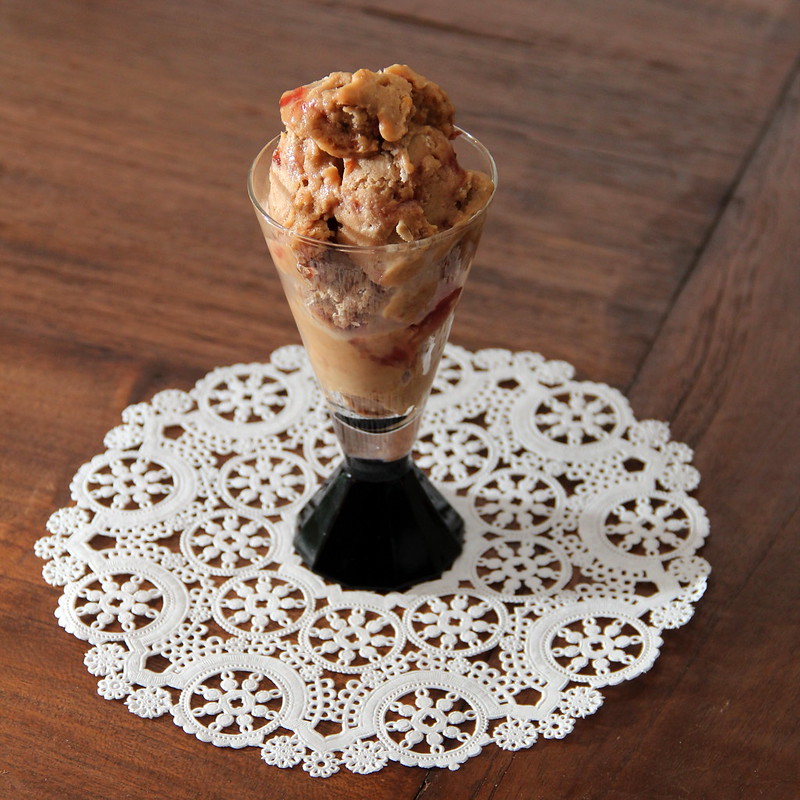
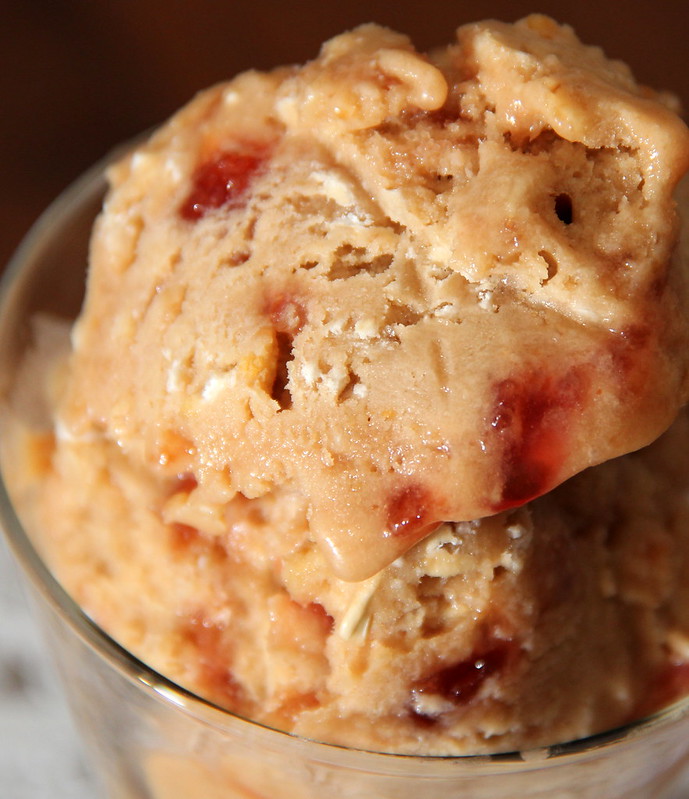
Once your ganache has cooled, coat the cookies in the velvety goodness.  In the end, your efforts will yield this beauteous monster.


Salty-sweet, chocolaty, and crispy bits dispersed throughout. Satisfying on all levels, and maybe just a little bit embarrassing to explain to your coworkers, who should really just be left in staggering awe.

Just don't forget- when you gaze long into the abyss, the abyss also gazes into you.

Friday, March 15, 2013

We Nerded Out for Pi π Day on CraveLocal.com

Whether or not you're brave enough to admit it, deep in your heart, you know that March 14th isn't just any other day. It's Pi (π) day. A day based solely on the love of the mathematical constant representing the ratio of the circumference of a circle to its diameter. Before Pi, March 14th was just another day, now, it's a reason to make pie. If you're that special combination of awesome that happens to recognize the significance of the day, or you're looking to impress a somewhat nerdy lover, it's time to break out your apron and horned rimmed glasses, we've got some work to do.

Though you may not have noticed it, or perhaps you're an unfortunate that doesn't have a local Trader Joe's, the chain has decided to up the ante on awesome. They've come out with a store brand of the somewhat elusive Biscoff, that also happens to remain vegan.


These cookies have a cinnamon-y depth, almost a rich caramel flavor that is absolutely begging to be pie crust. You see, as much as I may like to consume it, pie just doesn't flow as easily or as naturally as the other desserts. I've met the beast that is pie crust head on, battled a fortnight, and in the tired, bruised end, emerged the winner. Can I do it? Sure! Do I want to? How about a cookie crust? As a bonus, these make a killer base for coconut creme pie. Put down that rolling pin and trust me, I only want what's best.

Coconut Creme Pie
(because I haven't had one in about 14 years and that just ain't right)
 
1 cup cashews (soaked for at least 2 hours)
1 15 oz can of Coconut milk
1 cup Sugar
Scant tsp Salt
1/4 cup Bird's Custard Powder (You can sub cornstarch in a pinch)
2 tsp Vanilla extract
2 tablespoons Coconut Cream
1/4 cup of Coconut oil (broken into small pieces, not melted)
2 cups Unsweetened shredded coconut
1 Pack Speculoos cookies (or any cookie that strikes your fancy)
2 Tablespoons melted coconut oil or margarine (to mix with the crumbled cookies)


Preheat your oven to 375° F
Now to start off, there's no soy in this pie, but it's a custard. How do we work this wizardry? We soak some cashews! Abra-ca-soak!

   
This is a cup of cashews in enough water to cover them, for about two hours. You can test the readiness by taking one out and squeezing it. If it splits, crumbles, or yields in any way, you're ready.

In the meantime, take your entire pack of cookies for a spin in your food processor or blender. Combine these with your melted coconut oil or margarine, and press down into a greased 9" pie plate. Pop this in your oven for 10 minutes to set it.


Once your cashews are properly soaked, blend them with about 1/3 cup of water in a food processor or blender to form a loose puree, or cream. This will take a bit, you're looking for smoothness. If it's balling up on you, add a few more tablespoons of water.


In a large bowl, pour your coconut milk, custard powder (or cornstarch),  and whisk like nobody's business. If you're using the Bird's custard powder, you'll notice a delightful shade of pale orange, but just keep whisking until there are no lumps of dry powder.


As far as solid coconut oil goes, I have a gallon tub of the stuff. I'm very serious about my coconut oil. Because my vessel is so large, I can scrape what i need with a spoon to get curls of solid oil. For a mason jar of coconut oil, scoop out enough spoonfuls for the 1/3 of a cup, then break that mass down into chunks. The end goal is to evenly distribute the oil through the rest of the custard, like a colloidal suspension. Come on, it's Pi day, you need to geek it up a bit. Add the solid coconut oil, coconut creme, vanilla, and shredded coconut, and whisk like you mean it.
Once that's nicely combined, add in your cashew cream, and resume whisking.
Now that one arm is really strong, you're ready to go. Gently pour your custard into your pie crust. Don't just dump it in there like some brute.


Bake this wonderful representation of a mathematical constant for 35-40 minutes. When you pull it out, it shouldn't jiggle wildly, only slightly. Cool on a wire rack.


Now this is important, it smells wonderful, and it tastes pretty good warm from the oven, but leave it alone! This pie does beautifully chilled over night in the fridge. It sets the custard, allows it to relax, and for the flavors to develop. It really does a world of difference chilled overnight in both flavor and texture. I can't stress that enough. In fact, bake it the day before Pi (π)day, so you can spend the actual day languishing in the glory that is this pie.


If you recite it to the 5th decimal point by heart, you can reward yourself  with another slice!

Friday, March 8, 2013

A Subtle Green and Promises of Spring Proven False

St Patrick's day is nearly upon us, and some may find themselves shuddering at the thought of green bagels and green beer being pushed upon them at every turn.  Skip out of the passive voice and take control of your life! If you're not at peace with dumping who-knows-what into your food to achieve that lurid shade of green we've all come to know and love/dread around this time of year, but don't want to appear snobbish in the face of all the festivities; don't worry, there are alternatives.
How about Green Tea Cake with Blueberries; because that conniving, two-faced rodent of a groundhog said that it would be spring by now, and I'm going to bake a springtime cake as though it isn't snowing like the dickens outside.

While 'Culinary green tea' is a distinction that concerns me, and I'm left wondering what other grades of green tea lurk in the shadows,  it is readily available in Asian markets, as well as online super stores. It is indeed a powerful mojo, so make sure you have a steady hand while applying it.  This recipe will give you a subtle green hue, accentuated by the fresh blueberries, and very much a calling card of the spring you were promised so long ago.

Green Tea Cake with Blueberries
 1 and 1/2 cups Flour
1/2 cup Almond meal
1/2 tsp Salt
1 Tablespoon Baking powder
1 cup Sugar
1 and 1/4 cup (2.95 dl) Coconut milk
1/4 cup (.59 dl) melted Coconut oil (or canola/vegetable)
2 tsp vanilla extract
1/2 cup Fresh blueberries
Powdered sugar to dust
Sliced almonds for garnish

Preheat your oven to 350° F/ 176° C and grease a 9" round pan.
In a large bowl, combine your coconut milk, oil, sugar, and vanilla. In a separate bowl, combine your flour, almond meal, matcha powder, salt, and baking powder and mix until well incorporated.
Add the dry to the wet in batches, mixing just enough to incorporate. Once the two are combined into a batter, toss in your blueberries and  gently fold in.
Pour the batter into your prepared pan and bake for 30 - 40 minutes, or until an inserted toothpick comes out clean.


Once the cake has cooled, 15 minutes in the pan, then completely on a rack, decorate as you will. I dusted mine daintily with powdered sugar and sprinkled with sliced almonds before I devoured it.


The end result is light and fluffy, the flavors grassy, with a well rounded sweetness. Green enough to happily join in the festivities, but not so green that you  hate yourself in the morning.

Tuesday, February 26, 2013

Taking back Sunday: Pancakes Whenever You Want Them

I'm a firm believer in pancakes. Not only in that they do, in fact, exist, but that they are one of the perfect foods. Suitable for any time of day, and most any kind of mix in, their culinary flexibility should be the stuff of legend. Reserved for lazy weekends and Sunday brunches, they're often left to others to cook for us, from diners, to chains, even high end restaurants, and why? Where does the magic lie? Where is the mystery, the secret perfect technique that only 3rd parties can master? I say we shun the lines, the crowded vinyl booths, the narrow allotted time frames of brunch, and take a stand! You too can make pancakes, whenever or however you want them!

This is a basic pancake recipe, although I did stumble upon something cool at the local market. Powdered peanut butter. How can I resist such a thing? I can't, obviously. If you don't have the powdered peanut butter, you can omit it to no bad end. You can also stir in your everyday peanut butter, there's no shame in that- but you'll have to add a bit extra almond milk to smooth things out.

One of the key factors of pancakes, perhaps the trickiest, is the method in which you cook them. I used to cook pancakes like a bad infomercial: burnt, misshapen, sometimes on the floor. I also have a nasty habit of waiting until I'm near starving to cook, it doesn't help. They key that I've found, is time and practice. So grab a coffee, and take it slow, it'll be worth it.

 Pancakes in your PJs

1 cup Flour
1 tablespoon Baking Powder
1/4 tsp Salt
3 tablespoons Peanut butter Powder or 2 tablespoons regular peanut butter (optional)
1 cup Almond Milk (if using peanut butter, add up to 1/4 cup extra, slowly)
2 tablespoons Sugar
2 tablespoons melted Coconut oil (or Canola/Vegetable)
1/4 tsp Vanilla extract
Mix-ins (Blueberries, chocolate chips, bananas, skittles)
Earth balance to grease the pan (and top your pancakes!)

Preheat your oven to its lowest setting, and stash an oven-safe dish in it. If your house is as cold as mine is in the winter, don't skip this step.
In a large bowl, toss in your dry ingredients, and mix to combine. Add in your almond milk, oil, and vanilla, and stir until it only just comes together. Don't over mix the batter, but don't leave any big dry pockets. It will poof up in volume a bit, but it should subside into a somewhat lumpy, pourable batter. If it's too thick, add in almond milk a tablespoon at a time until you have your desired consistency. Have your ladle, spatula, pseudo-butter, and mix-ins on deck.

Choose the larger size of the non-stick skillet you're most comfortable with, put your burner on between low and medium, and slap a pat of pseudo-butter on the pan. Not too much, or you'll have a greasy pancake. It's okay, everyone's done it once. Once the earth balance has melted, spoon a ladle full, anywhere from 1/4 of a cup, to however big you want your pancake, into your pan. Now's the time to add your mix-ins, just drop them gently on the top of your cooking pancake. I chose blueberries, even if I really wanted chocolate chips. We all make sacrifices. Here's the trick: this doesn't happen fast. If it does, chances are your burner's up too high, turn it down a bit. Once the bubbles form around the edge of your pancakes, wait a little longer. A few bubbles toward the middle of your pancake mean it's ready to flip. If you're unsure, jiggle your pan a bit to see if the cake will freely move around. Once flipped, the second side will cook much quicker, so don't go anywhere. Move your perfect pancake to the warm dish in the oven.

After each go, wipe your pan down, quickly and carefully, with a dry paper towel, then add another pat of earth balance.

Stack your  cakes high, and top them as you wish!


Weirdly enough, I'm a bit of a purist. I'd slather them in good ol' pseudo-butter rather than maple syrup any day of the week

Now you can sit back and enjoy your emancipation from a potentially hectic Sunday at the mercy of a short-order cook.


Friday, February 22, 2013

Booze Hound, or, Is it Possible to Like Bourbon Too Much?


I’m not a beer girl, and not for a lack of trying, either.  It’s usually taken as a challenge, followed by a parade of beer, and a similar parade of scrunchy-faces on my part. It always ends the same; I can get a few sips in before I’m bored. Perhaps I have alcohol ADD, but the only beer that ever appealed to me was a 3.5%, blueberry laden, light weight of a beer that I can only find in a given burger joint. I discovered bourbon by complete serendipitous accident. One night, after arriving a bit late to a happy hour with friends, I noticed that one had something different in his glass. When he said it was Maker’s and offered me some, I curiously took a sip. I believe my exact words were: 'I feel like a dragon'.  
There were tones of vanilla, caramel, and a teeny hint of smoke. Very briefly there was a hint of sweetness that gave way to a fire that burnt a trail from tongue to belly.  It was complex, it was interesting, and it had my attention.  Now, I’m no booze hound, and I’m not going to tell you I know a lot about bourbon, or whiskey in general. I’ve had, to date, five different kinds of bourbon, and one of those was a bargain store brand.  When the nights are long and dark, and the winds get hold of you and just won’t let go, what I know is; it’s a bourbon night.


My love of bourbon has led to a few culinary explorations, for example, I put it in everything from cupcakes to ice cream, to pancakes. Don’t let anyone ever tell you that having bourbon in your pancakes is wrong. One such happy, pivotal discovery came the day before Christmas eve when I decided to make a cake for our family get together. I had two packs of dried figs, and wanted to make something chocolatey and decadent. I had visions of fruitcake dancing in my head, and I became obsessed with the notion of a spiced chocolate cake with figs and hazelnuts. I chopped up the figs nicely, when I had a monkey/monolith moment: bourbon. I let figs sit overnight covered in initially warmed bourbon, and spun them into my cake the next day. When the cake was reduced to crumbs, I was left with this mysterious elixir. It was darker, swirling with fig seeds, and it smelled amazing. Regrettably, I have only the following instagram shot to immortalize the moment.
That happy discovery became the center piece of our post-Christmas feast cheer, and it only left me wondering: what else can I do? 

I admit to being a novice infuser. I haven't actually looked up how to officially do it, while I have looked up how to make bourbon (which,as it turns out, seems to be a bit of a legal no-no). I'll admit to using the microwave to 'gently heat' the concoctions. I know enough to not let the bourbon boil, I don't want to fry what I'm infusing, only just heat it up until it's a bit warm- and it's what 90 proof? That can stay there for however long I want it to hang around. So, there's one rule of infusion club. Don't boil the infusions. Do talk about infusion club though, cause I feel like y'all are missing out. For instance, dried cherries spending a week in bourbon resulted in: Bad Babysitter Brownies


Fudgey, forbidden, flirty, and intoxicating. Score two for infusions. What about something a little more sophisticated? Some Earl Grey Tea perhaps? Oh hey, I can put that in banana bread, can't I? Boom.


A word of caution on tea, I did a warm infusion on this one, but kept it brief. Leave black tea hanging around in your bourbon for too long, and you'll have bitter, bitter bourbon. I'd like to revisit this one as a cold infusion, for subtleties' sake.

Want to get just plain weird? Try pine. Yes, pine. Be smart and consult your local florist. Definitely don't just blind-faith it, find a tree in your backyard, and use that. That'd be crazy... My resulting liquor was, to put it mildly, intense, but it translated wonderfully in cake form.


My second favorite, next to that initial fig, was coffee. Just a few beans in about 3 fingers of bourbon, over the course of roughly 3-5 hours. What did I do with that one? I drank it. 

For the record, that's pine, coffee, pine pictured above. Again, if you try pine, well, you know what your getting in to. At this point, yes, I have purchased fancy little 8 dram (.5 oz) bottles for my concoctions. For science. 

More delicate flavors sometimes require more, persuasion of sorts. For example this many rose petals, is simply not enough.


Over time it became this many:


Clearly the rose petals have given their all, and are completely faded. That amounts to roughly 1/4 of a cup. The flavor is a faintly floral/caramel-y bourbon that I feel would be lost in a baked good, unless you reinforce it with rose water. 

My most recent escapade is apricots. Started as a gift for our neighbor who lent us their snow blower in a time of dire need, I made a secondary batch about a week ago.

We're seven days in at the moment. I believe they are destined to be combined with tarragon and pine nuts, but am still working on whether or not the vehicle for them is blondies or a cake. I'm thinking blondies. 

There are endless possible combinations to which I've barely scratched the surface. One open door in a labyrinth of unending hallways. Whether it be to drink the resulting concoctions alone, or to create entirely new baked goods, I'm a bourbon girl through and through.

Monday, January 21, 2013

Only I scream for ice cream

Chiefly, not exclusively: I'm passionate about food. It is largely all I think about, from when I wake up in the morning, to when I go to sleep at night. The in between states are often filled with sleep addled thoughts such as 'pear sashimi' and 'oatmeal bourbon ice cream'.  Sometimes, I act on those thoughts, and while you should stay tuned for pear sashimi, this one's about ice cream.

My better half and I differ on a lot of things, but this statement was standing out in my mind as I began my ice cream adventure: "We basically like the same flavors, I just don't like chocolate."
I know I taught you better than that. Don't get me wrong, I like vanilla. I like the balance of chocolate and vanilla, and actually prefer vanilla frosting on my chocolate cupcakes. I'm a firm believer in the school of 'without light, there can be no dark'- but to say that our only difference is his not liking chocolate is nigh the same as saying "Sweetie, I'm almost human, except that I'm a total secondary jawed, talon laden, acid dripping alien."

This brings two things to light: I have yet to try a vegan vanilla ice cream that _actually_ tastes like vanilla ice cream (instead of coconut, or almond, or disappointment)
and mainly: what the hell else can I make?

Enter sleep addled thought 2, oatmeal ice cream. I've learned a couple of things proportion-wise from Hannah's Vegan A La Mode, and a couple of things crystal structure-wise from Alton Brown. Armed with my tiny knowledge I set out on a cold January weekend to make some ice cream, because not a lot of what I do in my free time makes any sense at all.

I like peanut butter, I like bourbon, I like oatmeal, I like raspberries: None of these things are chocolate, they go well together; and while I'm still confused as to where the oatmeal ice cream idea comes from, it should add a fair amount of body to the ice cream, as well as some weirdo oat bites that for some reason, I think will work. By integrating sugar and fat with the liquid, you create smaller ice crystals, but the end result may become overbearingly sweet. Adding just enough alcohol where the ice cream can still freeze, but not rock solid, will give it some body. Essentially, I add bourbon to everything, but today I will back it up with very, very loose (possibly erroneous) science. Go with it.
Have your ice cream maker's basin pre-frozen from the day before. I always leave mine in the freezer, just in case.


Breakfast of Champions

1 cup Rolled Oats (not instant)
1 cup Coconut Milk
1cup Almond Milk
3/4 cup Brown Sugar
I Tblsp custard powder (or cornstarch)
1/2 tsp Salt

2 Tsp Vanilla Extract
2 Tblsp Bourbon
2 Tblsp Peanut Butter
Your favorite Jam for addition later


Mix the oats, custard powder, sugar, and salt in a large microwave safe bowl, and whisk in the milks. Make sure to get any lumps of the custard powder/cornstarch worked out before you heat it up. You're looking to cook the oatmeal mixture until just tender, you don't want to bite into raw oats while you're eating ice cream. Start in 2 minute intervals, stirring in between, up until about 5-6 minutes. There's a larger liquid to oatmeal ratio here because again, you want this to be fairly loose, not standard gloppy oatmeal. Once that's ready and still hot, stir in your peanut butter to combine, as well as your bourbon and vanilla extract. 
Let the mixture come to room temperature, then park this either in your fridge, in the snow, or in your freezer to cool completely. You want to make ice cream, the colder this is, the better.

Once it's cold, start up your ice cream maker, and pour the mix in while it's running.
Take a peak:


Let this run as per the machine's directions (mine's about 20 minutes)
Move your half frozen ice cream to an air tight container. Here's the stage where you can fold in some additions. Normal people may choose chocolate here, but if you have a bizarro household as I do, fear not! You can fold in raspberry jam! You can also top it with chocolate shamelessly later! I won't judge you.

Here's the part where you learn why you never made ice cream before: you need to freeze that sucker solid for about 4-6 hours. This will put unnecessary strain on you and your relationships for the rest of the day. You know it's there. You know it's tasty. You also know you can't have it. It taunts you. Checking on it every hour doesn't help, either. Save yourself that pain, at least.

Eventually you will be rewarded. Perhaps with snide comments, such as: Have you ever seen me eat peanut butter ice cream before? 
But more rewarded with the issuing of the silent treatment and a scoop of this beauty:


The doily makes even this mammoth portion look dainty. Take a look at your swirl action, too!


Now, shut your pout-y mouth and pass the chocolate sauce!